ICQ Plus Tutorial
| Unofficial ICQ Plus Tutorial by Shoggot Originally posted on Skinz.org Message Board.
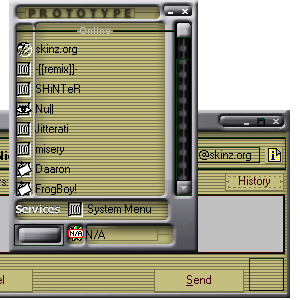
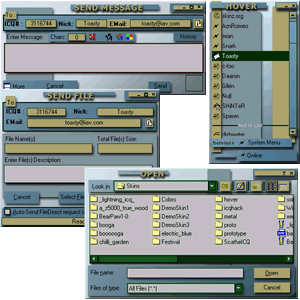
Need tutorial on ICQ Plus 2.+ resizing. HELP! I am still trying to figure out how exactly you make an image, cut it up in pieces to resize correctly. I have spoke with Shoggot but I am still confused. Please, anyone that can give me a step by step process in developing a resizable skin with ICQ Plus 2.+ please email me a tutorial. Would really appreciate it. I have spent over 15 hours trying to learn how to do it correctly and still I end up with a mess! HELP!Posted by Talismon at 10:05pm on 10 Jun 1999 ok, i'll make an attempt: first, make screenshots of the icq main & any other dialogs you wish to skin w/ no skin applied, ie, default. Now let's play w/ the main as an example. open up the screenshot of the main (btw, i'll be using photoshop for the examples since it's what i know best). now that you have the image of the default open, make a new layer. fill it w/ a background color, then make that layer invisible. now, think about waht moves when you resize the skin, & what doesnt... first, the title area: stays same height, & sits in upper left. titlebar buttons: stays the same size, stays at the top, & justifies to the right edge. status icons for nicks: they stay the same width from the left edge, but the area for them can be resized vertically. nicks: starts same distance from left edge, but area can be resized vertically . right edge of nicks is cut off at specific distance from right edge, which is also the width of the scrollbar. up & down buttons for scrollbar are fixed size, & are justified to right edge, & yto top & bottom of nick area, respectively. services/system menu: justifies to left edge, static height. main button & status window: justfied to left, status window expands to ake up all space left over after main button. ok, now keeping this in mind, make a few new layers, & start covering the static non-changing areas first w/ blocks of color to define their area. this would be the title, titlebar buttons, scrollbar, scrollbar buttons, & the main button. on another layer, define the area for the nick status icons, the status window, & the services/sysmenu window. now, make the invisible color-filled layer visible again, & you now have a template to work with. flatten layers, make new layers, & start creating an overall image or look for the skin. when done, flatten & save as a bmp. now, keep the plus menu open, select skin-->new-->main dialog-->edit. go through each tab & set everything to flat & transparent. now, go back to the first tab, check the bg image box, advanced, & edit. Now pick add. let's talk about this box for a bit... everything you add is a layer. the last item shown is drawn on top of all the others, the first item in the list is drawn underneath all the others, & so on through out the list. as for the specific options when you add, first is a pull-down for top/center/bottom; this defines vertical justification. pick top. now, to the right of that, is a text entry area & 2 radio buttons. to have a bitmaps top edge start right at the top, you would enter "0" in the text entry & the pixels radio button. if you want it to start 20 pixels down from the top, you would enter 20, & choose pixels. if you wanted it to start 20% of the total hieght oif the window down from the top, you would pick 20, & the % radio button. bottom works much the same way, but a) refers to the bottom edge of the bitmap & b) uses negative numbers. if you want a bitmaps bottom edge to start right at the bottom of the window, choose bottom - 0 - pixels. if you want it to start 20 pixels up from the bottom, it would be bottom - "-20" - pixels.see? now, the next area works the same way: left/center/right. left refers to the left edge of the window & the left edge of the bitmap, & right refers to the right edge of the window & the right edge of the bitmap.. same thing applies, for 20 pixels from the left would be left - 20 - pixels, 20 from the right edge would be right - "-20" - pixels.comprendez? ok, moving on. so, select the title area of your bitmap, copy, & make your copy into a new image, & name it something you'll remember, like "MainTitleTopLeft.bmp". now, in the add section, select that .bmp, & have the settings: top - 0 - pixels, left - 0 - pixels. now, make a new bmp out of the titlebar buttons, call it something appropriate, and hit add... settings would be (can you guess?) top - 0 - pixels, right - 0 - pixels. hit ok, ok, ok, & apply & see what happened... ok, now lets add an overall background. make a new image, say 50x50, fill it w/ your background color, & save it as somethiung appropriate, like "mainBackground.bmp". hit add, & here's where we get funky; basic settings are the same as for the title... top & left... but now we're gonna do a bit more. see where it says normal at the bottom? Hit it, & select "tile". this will repeat that image, to specifications i'll go into next. now, hit the "width" checkbox. you want this image to tile over the entire width, so hit percentage radio button, & enter 100 as the amount... so now it'll tile over 100% of the window. you walso want it to cover the window up & down, so do the same for height. now apply, & take a look. EEK! where did your title & buttons go? They're still there, they're just covered... remember the order: whatevers last in the list gets drawn last, & can cover anything before it, if it's big enough... so go back to where the add button is, & select the background.bmp entryu, & hit the "up" button a couple of times... hit apply, & bam, there it is... the starting point to making your own skin. extras: if ytou need an irregular shape to float above others, hit the transparent button, & make sure the areas of the bitmap that you -dont- want seen are a single color, & select that color from the color selector beside the transparent button... ok, i'm sure there's a lot more detail that should be covered, but that might be enough to at least start figuring it out... & if anyone wants to format this (I know the skinz msg bd murders the eyes on long posts like this), be my guest & post it, but please give me credit... & folks, feel free to deconstruct my skins to give you an example; i was very careful to use logical names for all the bitmaps in "hover", so it should be a good place to start... but be warned, rip my work & expect to be flamed to a crisp =) thanks for trying to skin icq+ the -real- way! this is a good sign... Posted by _Shoggot_ at 01:15am on 11 Jun 1999 ok stupid lil old me wants to know why and what you are resizing i am a lil lost but am intereasted as i do wanna learn more Posted by LadyofSorrows at 01:05pm on 11 Jun 1999 ok, icq2 tute-rant pt2: ok, resizing. when you change the size of the icvq window, some parts maintain their position & size, others move & change size.... when you make a skin w/ a simple background, & set it to center, it may look ok at the size that you made it for, but if you resize the window, it looks like crap. ok, so why not just set the image to stretch? becaus then -everything- in the background scales & resizes to the new dimension, while the parts of the icq window don't behave that way. the solution is to make parts (.bmp's) which behave in the same way as the parts of the icq window. so, we make a bitmap the same size & shape as the icq button, & we set it in the lower left corner.... how? By going to the first tab, background, advanced, edit, add, selecting the bitmap you just made, & slecting bottom-->0-->pixels & left-->0-->pixels. hit ok & apply, & check it out... change the shape of the window all you want, the icq button you just made stays in place, moves with the window. Part three when someone asks for more specific info, i guess... Posted by _Shoggot_ at 05:02pm on 11 Jun 1999
|

